




Comment broder back stitch

Tutoriels de points de broderie > Tous les points > back stitch
The back stitch, step by step
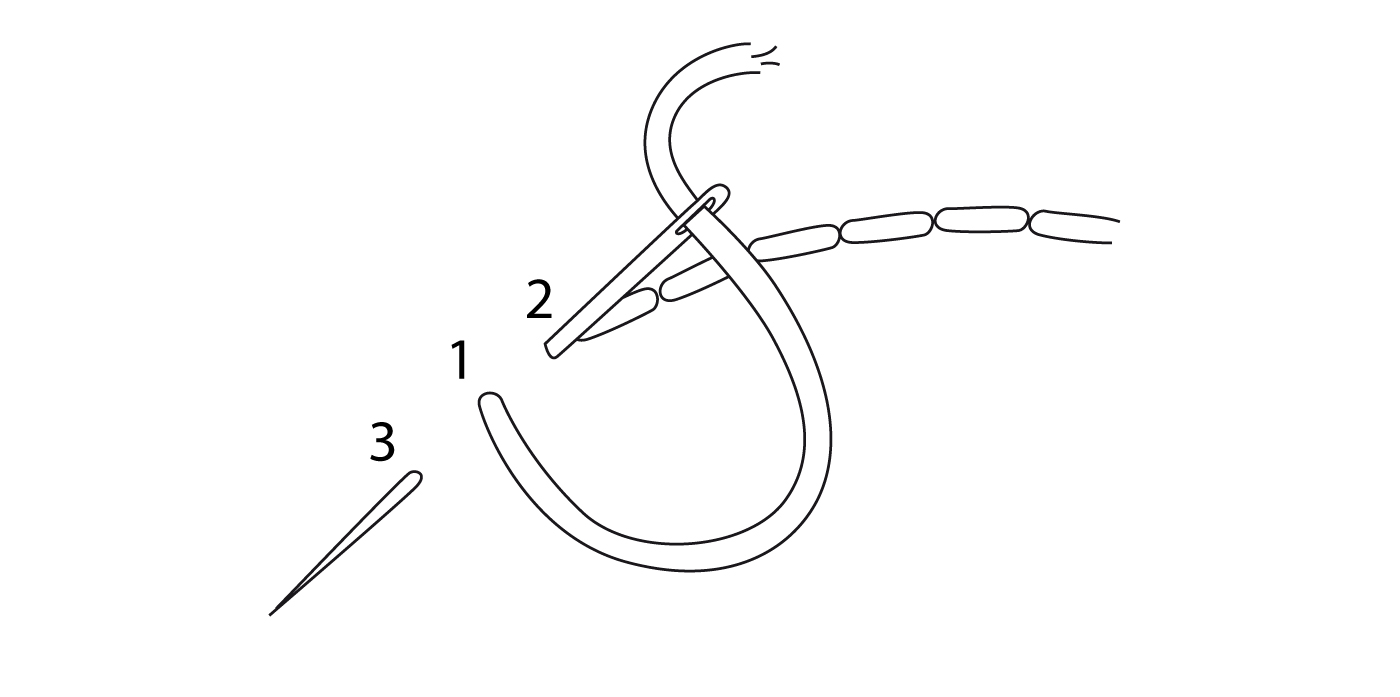
We guide you here, step by step, to embroider the back stitch.
This linear stitch is worked with a back-and-forth motion to produce a continuous, very precise line.
1 – Work the first stitch
Bring the needle up at A on the front of the fabric. Insert it at B, behind on the line, then bring it up at C towards the front at an equal distance from A and B.
2 – Build the continuous line
Insert the needle at D, exactly at the end of the previous stitch, leaving no gap. Bring it up at E towards the front at a regular distance. Each new stitch fills the space left by the previous one, forming a continuous, unbroken line.
3 – Finish the line
Continue the back-and-forth motion along the full length of the line, keeping the stitch length consistent. Pass the thread to the back of the fabric and secure it under the stitches already worked.
FOR RIGHT-HANDED EMBROIDERERS: Hold the needle in your right hand. Work from right to left, inserting the needle back along the line and bringing it up forward at a regular distance.
FOR LEFT-HANDED EMBROIDERERS: Hold the needle in your left hand. Work from left to right, inserting the needle back along the line and bringing it up forward at a regular distance.

Tips for a perfect back stitch
First stitch backward: The first motion always consists of inserting the needle back at B — this backward movement is what gives the back stitch its continuous, gap-free line.
Stitch alignment: Always insert the needle at the exact end of the previous stitch to avoid any offset and achieve a continuous line without gaps.
Consistent rhythm: Work at a steady pace to produce stitches of equal length and a homogeneous line throughout.
Thread tension: Pull the thread without excess to keep the line flat and avoid puckering the fabric.
Stitch length: Use short, even stitches for a precise line, especially around curves.
Result
On the front: A continuous, clean, and regular line with no visible gap between stitches.
On the back: A line of longer, spaced straight stitches forming a broken path.
EXPLORE FURTHER

The back stitch, an essential stitch for learning hand embroidery
The back stitch is used to draw clean, highly precise lines, whether on geometric shapes or freehand motifs.
It is essential in traditional embroidery for outlines, embroidered lettering, and fine details that require a continuous line.
It appears in letters, monograms, and all motifs requiring an unbroken line.

The back stitch is a fundamental linear stitch.
It is built with a back-and-forth motion that systematically fills the gaps between stitches.
This construction produces a continuous, regular, and perfectly clean line.
It is used in hand embroidery to draw precise and structured lines.
DISCOVER OTHER STITCHES

Why learn the back stitch?
• master the construction of a continuous, unbroken line
• develop precision and accuracy in following a line
• learn to work a line stitch by stitch with consistent regularity
• build the foundation for many filling and outline stitches derived from the back stitch
Learn the back stitch with Un Chat dans l’Aiguille
At Un Chat dans l’Aiguille, the back stitch is taught step by step with clear, structured guidance.
Our approach to teaching is part of a complete hand embroidery stitch encyclopaedia, designed to support every embroiderer on their journey.
It allows you to progress at your own pace whilst building precision, consistency, and confidence in hand embroidery.