




Comment broder Blanket stitch insertion
Tutoriels de points de broderie > Tous les points > Blanket stitch insertion
The Blanket stitch insertion, step by step
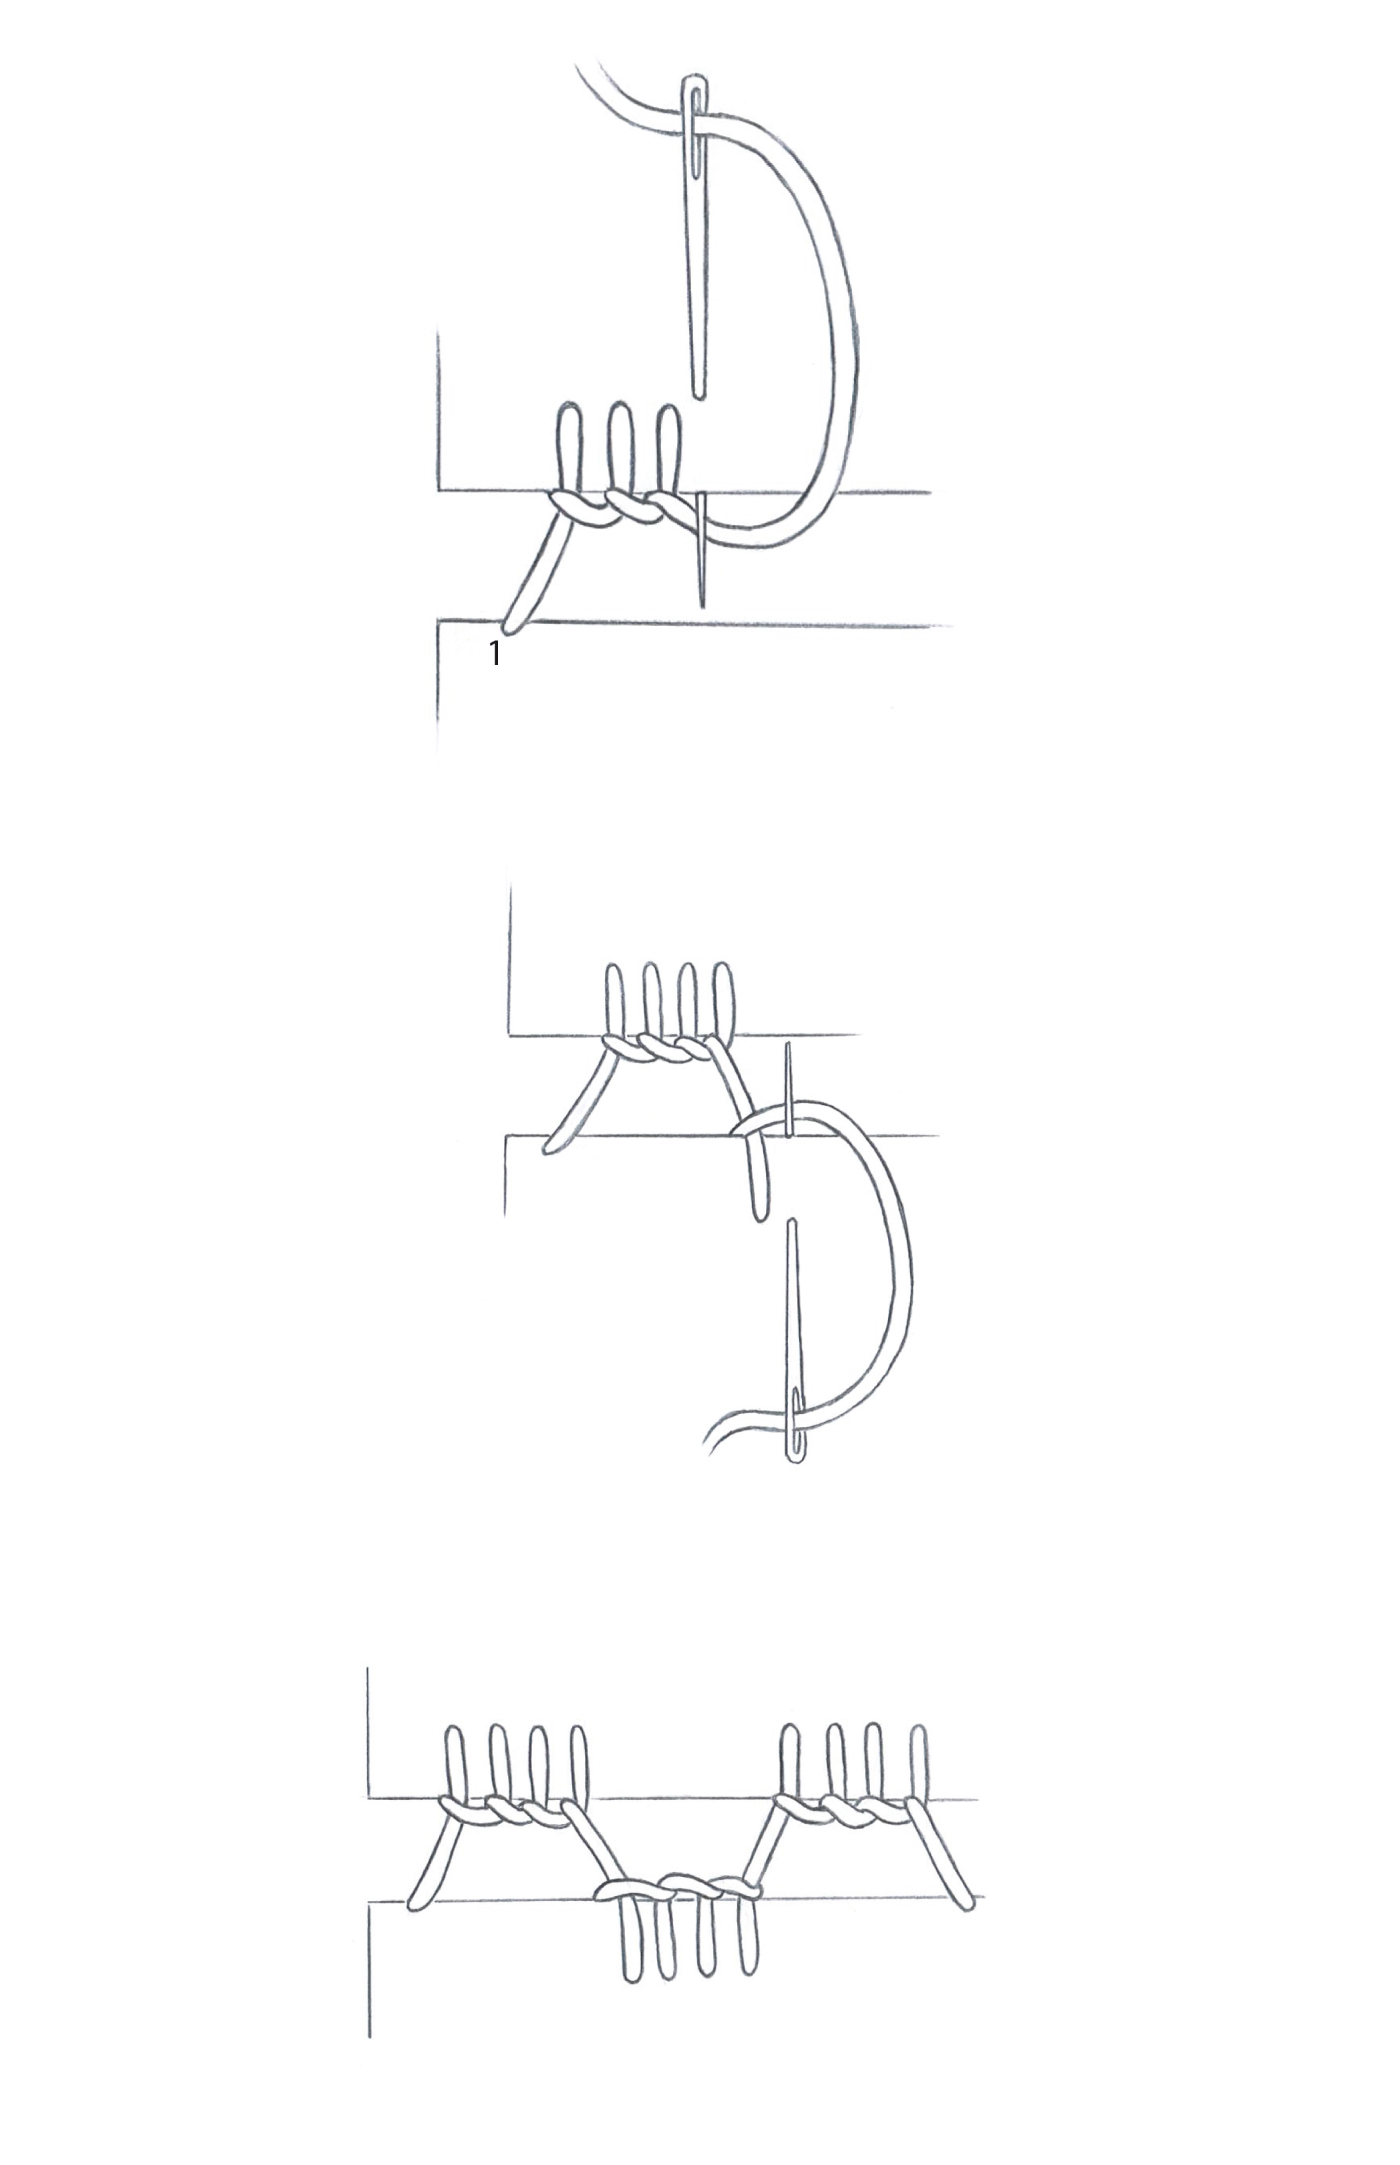
We guide you here, step by step, to embroider the Blanket stitch insertion.
The blanket stitch insertion is worked by alternating groups of blanket stitches between two hemmed edges, arranged in a staggered pattern, to form a rhythmic, decorative openwork structure.
1 – Begin the first group
Fasten the thread on the wrong side of the fabric. Bring the needle up at A on the edge of the lower hem. Insert on the upper edge opposite, from right side to wrong side, keeping the thread under the tip of the needle. Pull to form the first blanket stitch. Repeat the same gesture to form a group of blanket stitches along the upper edge.
2 – Work the next group on the lower edge
Turn the work around. Insert on the lower edge, slightly offset from the previous group, from right side to wrong side. Keep the thread under the tip of the needle and bring up along the hemmed edge. Pull to form the stitch. Repeat to form a group of blanket stitches along the lower edge.
3 – Build the pattern
Continue alternating groups of blanket stitches from one edge to the other. Offset each group to achieve a staggered pattern. Maintain an even distance between the two edges and a harmonious spacing between the groups.
4 – Finish the stitch
Insert the needle into the selvedge of the hem. Fasten the thread on the wrong side by passing it under the stitches already worked. ___________
FOR RIGHT-HANDED EMBROIDERERS: Work from left to right, working the groups successively on the upper edge then on the lower edge.
FOR LEFT-HANDED EMBROIDERERS: Work from right to left following the same principle. Tips for a successful blanket stitch insertion

Tips for a perfect blanket stitch insertion
Needle angle: Insert the needle vertically at each stitch to maintain an even alignment and well-formed groups.
Thread position: The thread must always pass under the tip of the needle — it is this gesture that correctly forms the characteristic loop of the blanket stitch.
Group size: The number of stitches per group determines the appearance of the pattern — groups of four stitches give a balanced result, but this number can vary according to the desired effect.
Precise stagger: Make sure each group is clearly offset from the previous one — an approximate stagger would break the visual rhythm of the whole.
Spacing between groups: Mark even reference points on both edges beforehand to ensure a consistent spacing from one group to the next.
Result
On the front: a succession of alternating groups of blanket stitches forming a staggered openwork insertion.
On the back: even anchor stitches distributed along both edges.
EXPLORE FURTHER

The Blanket stitch insertion, an essential stitch for learning hand embroidery
The blanket stitch insertion is used to join two hemmed edges while creating a rhythmic openwork decoration, particularly appreciated in traditional embroidery for decorative finishes and assemblies.
The alternation of staggered groups produces a light, balanced structure whose appearance varies according to the number of stitches per group and the chosen spacing.
It is used both to join two pieces of fabric and to insert an openwork band at the heart of an embroidered piece.

The blanket stitch insertion: a variation of the blanket stitch worked between two hemmed edges in alternating groups.
Its construction rests on a regular alternation of groups of stitches arranged in a staggered pattern, without piercing the fabric at the centre.
This architecture produces a structure that is both decorative and functional, adaptable according to the size of the groups and the distance between the edges.
It is an accessible technique in hand embroidery for joining and embellishing textile pieces with elegance.
DISCOVER OTHER STITCHES

Why learn the Blanket stitch insertion?
• understand the blanket stitch applied to an insertion structure in alternating groups
• develop a sense of rhythm and regularity in building a staggered pattern
• learn to manage both the spacing of groups and the distance between two edges simultaneously
• enrich compositions with structured, openwork decorative joins
Learn the Blanket stitch insertion with Un Chat dans l’Aiguille
At Un Chat dans l’Aiguille, the blanket stitch insertion is taught step by step with clear, structured guidance.
Our approach to teaching is part of a complete hand embroidery stitch encyclopaedia, designed to support every embroiderer on their journey.
It allows you to progress at your own pace whilst building precision, consistency, and confidence in hand embroidery.