




Comment broder Buttonhole wheel stitch
Tutoriels de points de broderie > Tous les points > Buttonhole wheel stitch
The Buttonhole wheel stitch, step by step
We guide you here, step by step, to embroider the Buttonhole wheel stitch.
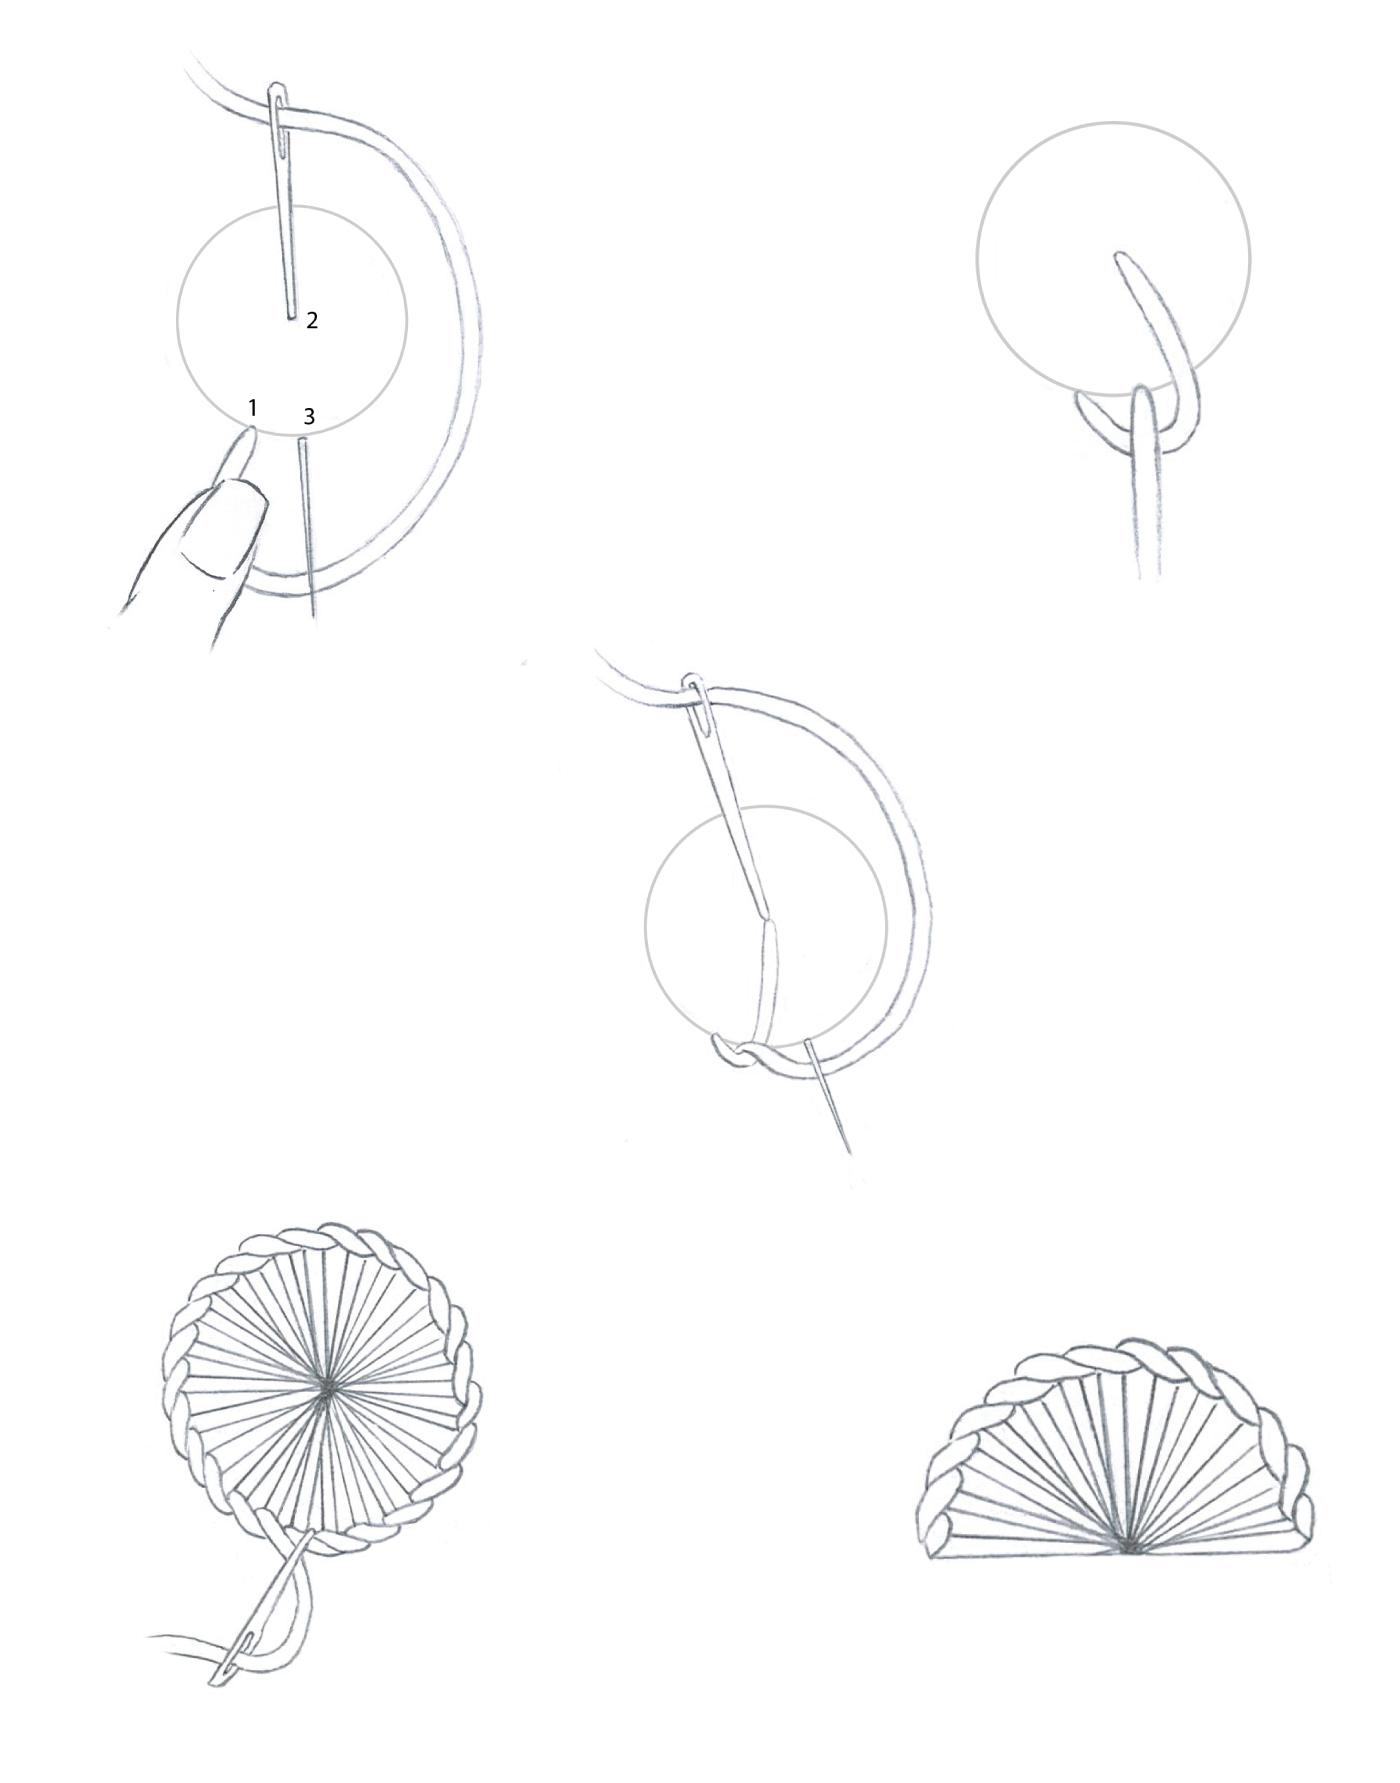
This circular filling stitch is built from a succession of radiating blanket stitches inserted at the centre and brought up on the outline to form a blanket stitch wheel.
1 – Place the first stitch
Bring the needle up at A on the outer edge of the circle. Insert it at B in the centre, keeping the thread held down with your thumb. Bring it back up at C on the outer outline, just to the right of A, sliding the needle tip under the thread. Pull firmly towards you and flat against the fabric so the stitch lies flat on the outline.
2 – Continue the wheel
Insert the needle again at the centre in the same hole, keeping the thread held down with your thumb. Bring it back up on the outer outline, a short distance from the previous stitch — the stitches must neither touch nor overlap, but remain close enough for each loop to follow the curve of the circle. Pull firmly towards you and flat against the fabric. Always bring the needle up exactly on the line. Continue in this way all the way around the circle.
3 – Close the wheel
When you reach the last stitch, bring the needle up at A through the first stitch. Then insert it inside the wheel, between the first and second stitch, to close the motif. Pass the thread to the back of the fabric and fasten it under the stitches already worked. ___________

Tips for a perfect buttonhole wheel stitch
Always insert in the same central hole: Insert the needle exactly in the same hole each time — this ensures all the spokes converge at a single centre and the wheel remains regular.
Always bring up exactly on the line: Always bring the needle up exactly on the outer outline — never inside or outside it. A single misplaced stitch is enough to break the regularity of the circle.
Pull firmly: Pull the thread firmly towards you and flat against the fabric after each stitch so the loop lies flat on the outline. If the thread lifts away from the outer edge, this is a sign of insufficient tension.
Stitch spacing: Stitches must neither touch nor overlap, but remain close enough for each loop to follow the curve of the circle. Too wide a gap prevents the thread from hugging the outline.
The small central hole: Pulling firmly at each stitch may create a small hole at the centre — this is perfectly normal and very decorative, enhancing the radiating wheel effect.
Result
On the front: A circular wheel whose radiating blanket stitches all start from a common centre, forming a regular and well-defined decorative motif.
On the back: A succession of stitches converging towards the centre of the circle.
EXPLORE FURTHER

The Buttonhole wheel stitch, an essential stitch for learning hand embroidery
The buttonhole wheel stitch is particularly suited to filling small circular motifs and can be used to create stylised flowers, rosettes, or radiating decorative elements.
By varying the spacing of the stitches on the outline, you can achieve a denser or more open result depending on the desired effect.
It is often used in traditional embroidery to enrich the heart of a flower, the centre of a medallion, or any round motif that calls for a structured filling.

The buttonhole wheel stitch: a circular variation of the blanket stitch.
Its construction is based on radiating stitches worked from a common centre, whose loops rest on the outer outline of the circle.
This arrangement creates a structured and decorative circular motif.
It is greatly valued in hand embroidery for filling round motifs with precision and regularity.
DISCOVER OTHER STITCHES

Why learn the Buttonhole wheel stitch?
• understand the construction of radiating stitches
• develop precision of movement and tension control
• explore circular filling stitches
• enrich floral compositions and decorative motifs
Learn the Buttonhole wheel stitch with Un Chat dans l’Aiguille
At Un Chat dans l’Aiguille, the buttonhole wheel stitch is taught step by step with clear, structured guidance.
Our approach to teaching is part of a complete hand embroidery stitch encyclopaedia, designed to support every embroiderer on their journey.
It allows you to progress at your own pace whilst building precision, consistency, and confidence in hand embroidery.