




Comment broder Fly stitch

Tutoriels de points de broderie > Tous les points > Fly stitch
The Fly stitch, step by step
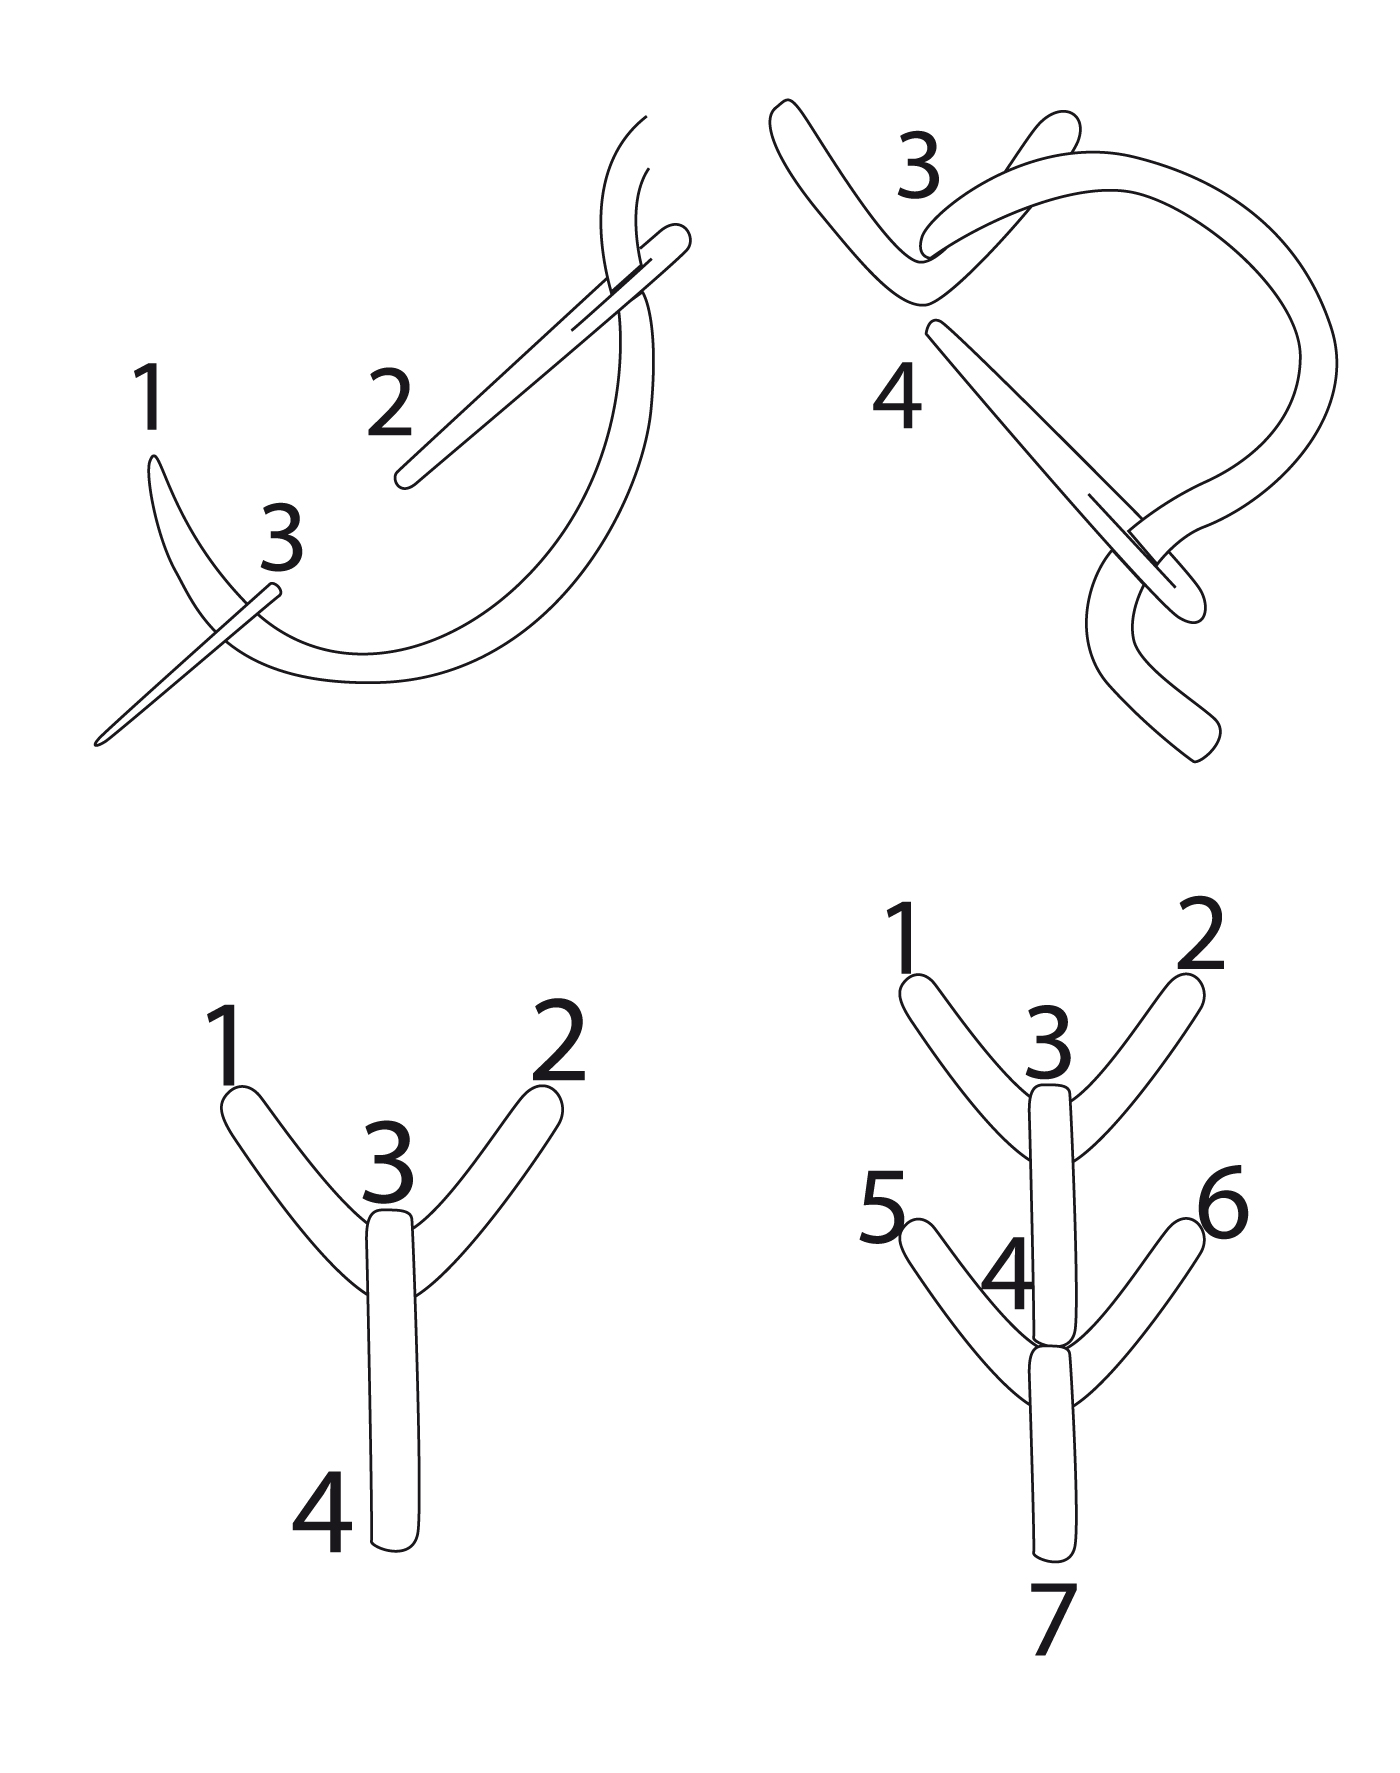
We guide you here, step by step, to embroider the Fly stitch.
This stitch forms an open V-shaped loop secured by a straight anchoring stitch, creating small, light, and evenly spaced motifs along a line.
1 – Place the V
Bring the needle up at A. Insert it at B, level with A and at the desired distance, keeping the thread held down with your thumb. Bring the needle back up at C, midway between A and B and slightly below, with the thread passing under the needle tip.
2 – Form the loop
Pull the thread gently to form the open V-shaped loop. Avoid pulling too firmly so the opening of the motif is preserved.
3 – Anchor the stitch
Insert the needle at D, just below C, to secure the loop with a small straight vertical stitch. Pass the thread to the back of the fabric and fasten it under the stitches already worked. ___________
FOR RIGHT-HANDED EMBROIDERERS: Work from top to bottom, angling the V from left to right.
FOR LEFT-HANDED EMBROIDERERS: Work from top to bottom, angling the V from right to left. Tips for a successful fly stitch

Tips for a perfect fly stitch
Principle: The V-shaped loop is formed by keeping the thread under the needle tip before pulling through — this single action determines both the openness and the evenness of each motif.
Point C: Position C exactly midway between A and B to achieve a perfectly symmetrical and balanced V.
Tension: Pull the thread gently and consistently on each loop to maintain an even rhythm across the whole composition.
Anchoring stitch: Vary the length of the straight stitch at D to alter the effect — short for an open, graphic V, longer for a more elongated leaf-like shape.
Spacing: Keep a consistent distance between A and B throughout the row to produce a regular, airy arrangement.
Result
On the front: A small, open V-shaped motif, neat and well-defined, secured by a straight stitch.
On the back: Two anchor points corresponding to the beginning and the securing of each loop.
EXPLORE FURTHER

The Fly stitch, an essential stitch for learning hand embroidery
This stitch lends itself to building small, repeating motifs that can be worked in isolation or in sequence.
It sits naturally within traditional embroidery to suggest a distant swallow in flight, stylised leaves, or delicate floral details.
Its lightness makes it well suited to adding life to a background or refining an outline without weighing down the overall design.

The fly stitch: an open decorative stitch belonging to the looped stitch family.
Its construction rests on a V-shaped loop held in place by a straight anchor stitch.
Adjusting the length of the securing stitch allows the shape of each motif to be varied according to the desired effect.
It is a versatile and approachable stitch, essential for exploring the decorative possibilities of hand embroidery.
DISCOVER OTHER STITCHES

Why learn the Fly stitch?
• understand the construction of open, looped stitches
• master the technique of holding the thread under the needle tip to form a precise loop
• develop evenness of movement for airy and well-balanced compositions
• explore variations in the anchoring stitch to expand your decorative repertoire
Learn the Fly stitch with Un Chat dans l’Aiguille
At Un Chat dans l’Aiguille, the fly stitch is taught step by step with clear, structured guidance.
Our approach to teaching is part of a complete hand embroidery stitch encyclopaedia, designed to support every embroiderer on their journey.
It allows you to progress at your own pace whilst building precision, consistency, and confidence in hand embroidery.