




Comment broder Sorbello stitch
Tutoriels de points de broderie > Tous les points > Sorbello stitch
The Sorbello stitch, step by step
We guide you here, step by step, to embroider the Sorbello stitch.
Sorbello stitch is worked by forming a straight stitch around which the thread is wrapped twice, creating a small, regular and structured raised rosette on the fabric surface.
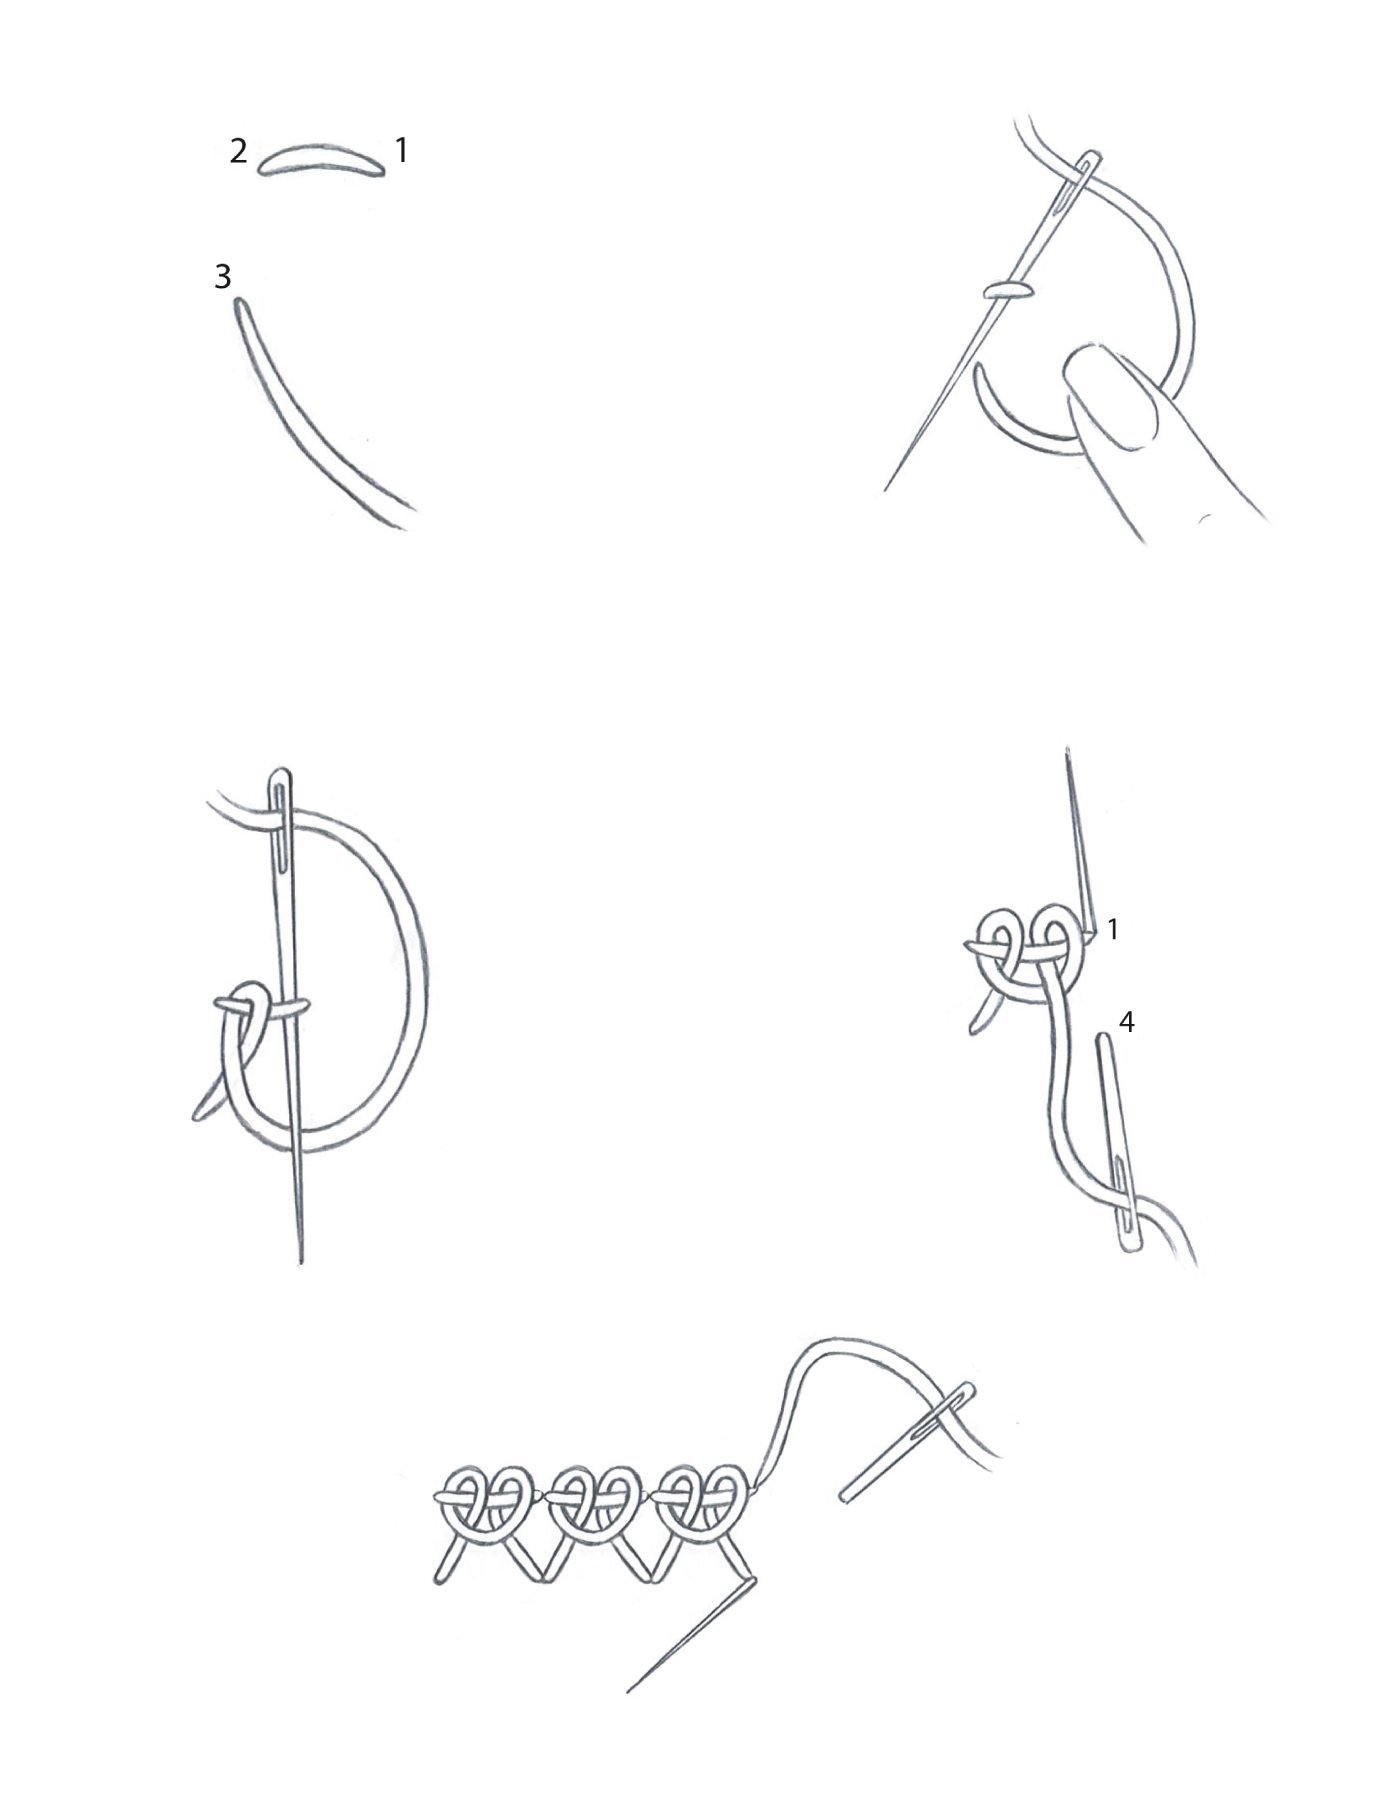
1 – Bring the needle up at A on the right side of the fabric. Insert the needle at B and bring it up at C to form a straight stitch.
2 – Hold the thread down with your thumb. Slide the needle from top to bottom under the straight stitch. Pass the thread under the tip of the needle and pull gently to begin the wrap.
3 – Repeat this motion a second time, passing under the straight stitch again. After this second pass, the thread wraps completely and forms a small rosette.
4 – Insert the needle at D, just below B, to anchor the rosette. The Sorbello stitch is complete.
To work a row: bring the needle back up at B and repeat the same gestures working to the right. Pass the thread to the wrong side and fasten it under the stitches already worked. ___________
FOR RIGHT-HANDED EMBROIDERERS: Sorbello stitch is worked from left to right.
FOR LEFT-HANDED EMBROIDERERS: Sorbello stitch is worked from right to left. Tips for a successful Sorbello stitch

Tips for a perfect sorbello stitch
Needle direction: Always slide the needle from top to bottom under the straight stitch so that the thread wraps evenly.
Double wrap: Always make two passes under the straight stitch — it is this double wrap that gives the rosette its balanced, well-defined shape.
Straight stitch tension: Make sure the straight stitch is well tensioned before wrapping — it supports the entire rosette and determines the consistency of the result.
Progressive tension: Pull the thread gradually and steadily to preserve the raised effect of the rosette without flattening it.
Rosette spacing: Space the stitches evenly to show off each rosette and prevent them from overlapping.
Result
On the front: a row of small, even raised rosettes, neat and well structured.
On the back: a series of small straight stitches aligned along the row.
EXPLORE FURTHER

The Sorbello stitch, an essential stitch for learning hand embroidery
Sorbello stitch is used to compose ornamental borders, enrich textured surfaces or outline the contours of a floral motif.
It appears frequently in traditional Italian embroidery, particularly from the Umbria region where it originates.
The size of the rosettes can be varied by adjusting the length of the base anchor stitch for a more or less pronounced effect.

Sorbello stitch: a decorative knotted stitch of Italian origin.
Its structure relies on a straight anchor around which the thread passes twice without piercing the fabric, forming a precise and repeatable small volumetric motif.
This straightforward technique produces a line that is both structured and ornamental, adaptable to straight lines and curves alike.
It holds a distinguished place in the repertoire of expressive stitches in hand embroidery.
DISCOVER OTHER STITCHES

Why learn the Sorbello stitch?
• discover how to build a knotted stitch around a straight anchor
• develop precision of movement on wraps worked without piercing the fabric
• create ornamental lines with strong decorative character
• enrich your compositions with an Italian stitch of unique character
Learn the Sorbello stitch with Un Chat dans l’Aiguille
At Un Chat dans l’Aiguille, Sorbello stitch is taught step by step with clear, structured guidance.
Our approach to teaching is part of a complete hand embroidery stitch encyclopaedia, designed to support every embroiderer on their journey.
It allows you to progress at your own pace whilst building precision, consistency, and confidence in hand embroidery.