




Comment broder Rosette stitch
Tutoriels de points de broderie > Tous les points > Rosette stitch
The Rosette stitch, step by step
We guide you here, step by step, to embroider the Rosette stitch.
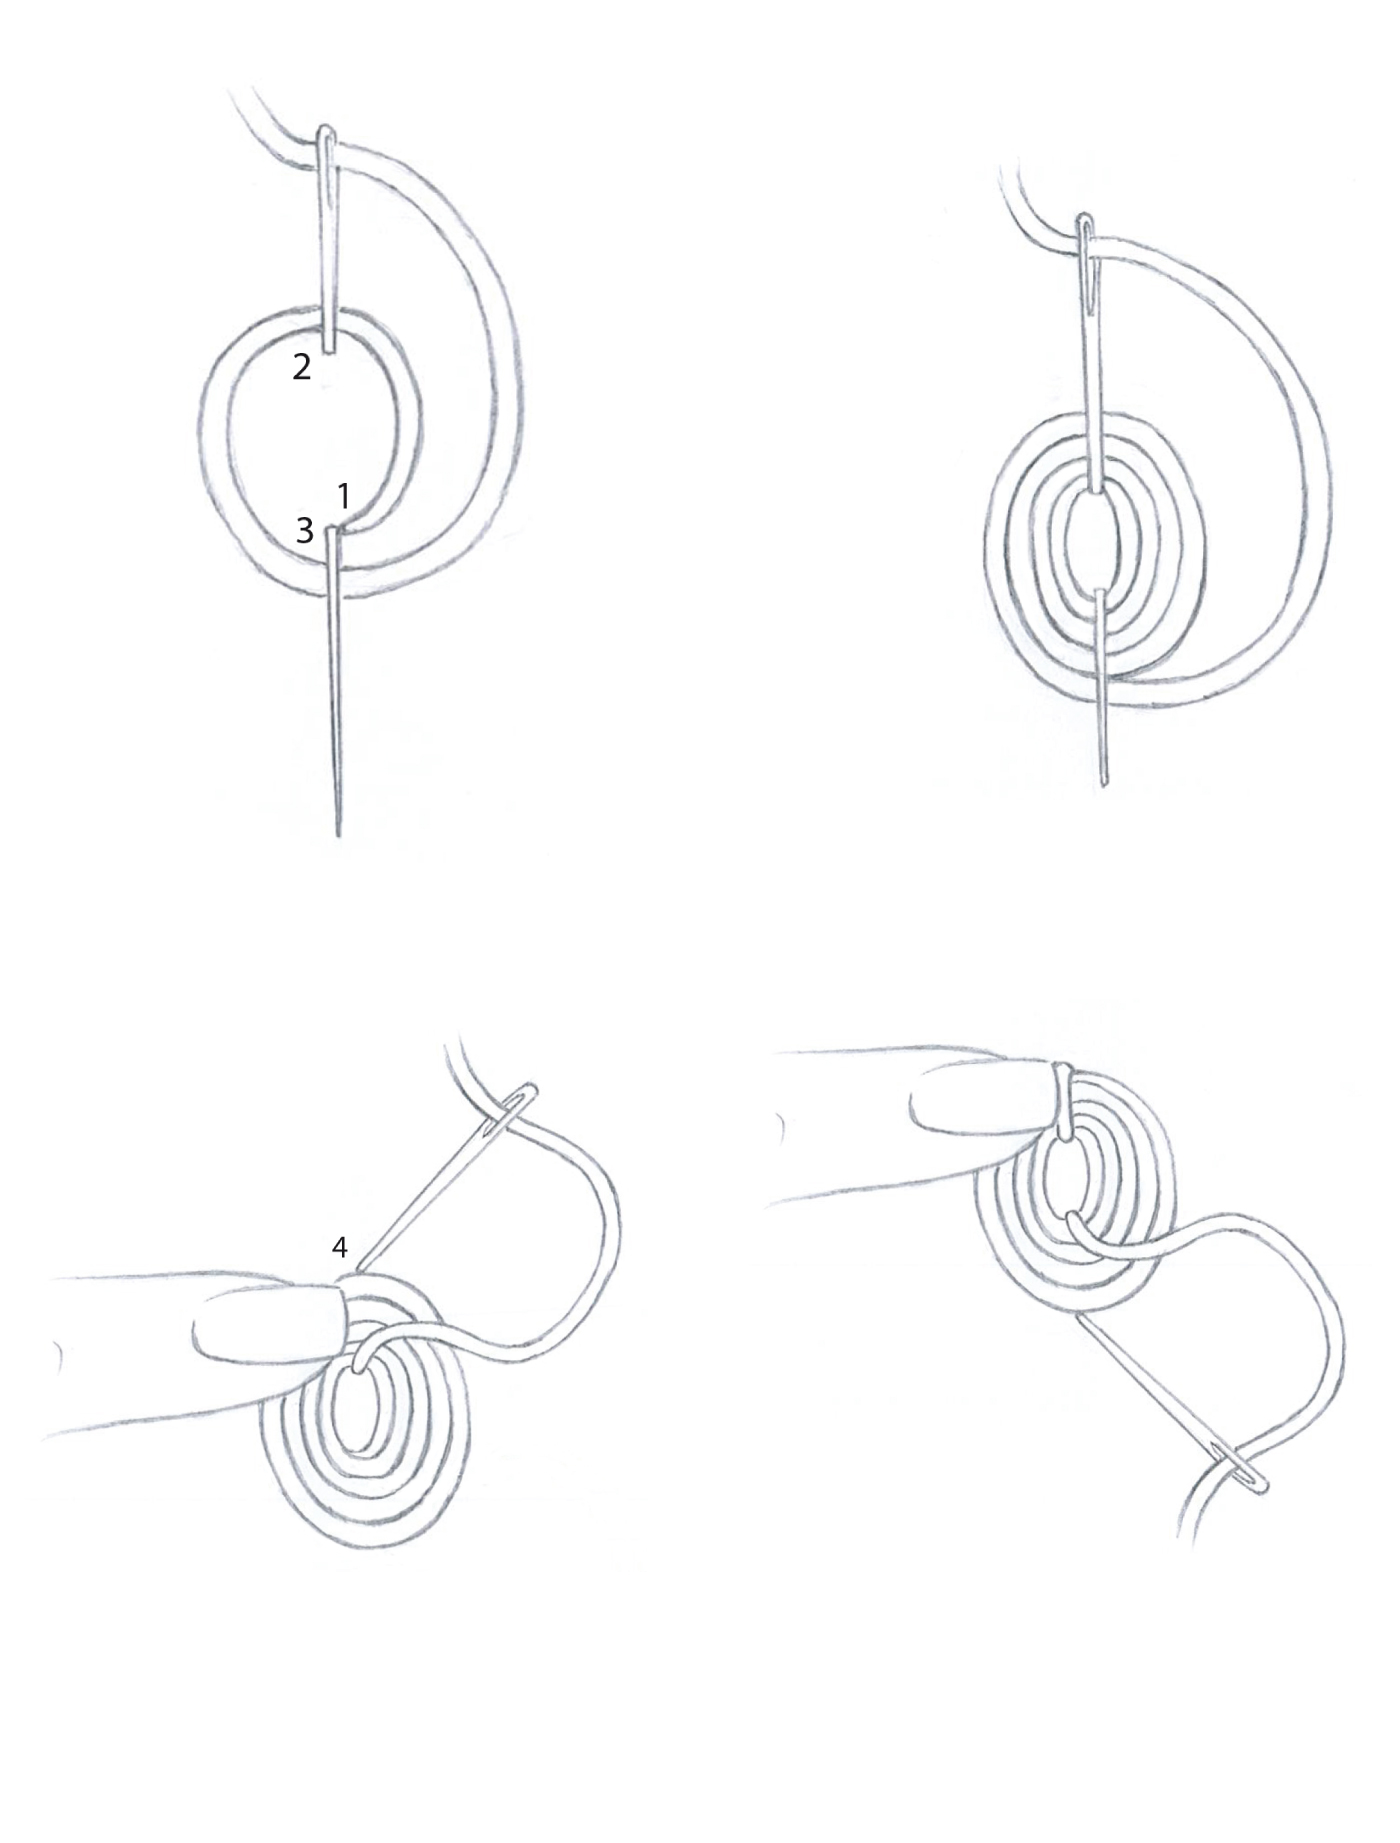
This stitch consists of passing the thread under two straight stitches worked along the same axis, to form a circular raised motif.
1 – Work the straight stitches
Bring the needle up at A and insert it at B to form a first straight stitch. Bring it up at C and insert it at D to form a second straight stitch. Both straight stitches are worked along the same axis.
2 – Begin the weaving
Bring the needle up just to the left of one of the two straight stitches. Slide the needle under that first straight stitch without piercing the fabric, then directly under the second straight stitch, again without piercing the fabric.
3 – Form the rosette
Continue turning anti-clockwise, sliding the thread under the two straight stitches with each pass. Pull gently after each round to form a regular, circular motif. Distribute the passes evenly until you obtain a dense, well-structured rosette. Pass the thread to the back of the fabric and secure it under the stitches already worked.
FOR RIGHT-HANDED EMBROIDERERS: Hold the needle in your right hand. Slide the thread under the straight stitches turning anti-clockwise, keeping the fabric stable with your left hand.
FOR LEFT-HANDED EMBROIDERERS: Hold the needle in your left hand. Slide the thread under the straight stitches turning clockwise, keeping the fabric stable with your right hand.

Tips for a perfect rosette stitch
Length of the straight stitches: Work straight stitches long enough to allow several passes of the thread around the structure without the rosette becoming too tight.
Tension of the base stitches: Keep both straight stitches well taut so they maintain their structure and support the weaving correctly.
Thread tension: Pull gently after each pass to form a regular, voluminous rosette without crushing the structure.
Consistency: Distribute the passes evenly around the two straight stitches to obtain a well-balanced circular motif.
Direction: Always maintain the same direction of rotation throughout the weaving to ensure a regular, cohesive result.
Result
On the front: A small raised rosette forming a dense, structured circular motif.
On the back: Two straight stitches serving as the support for the weaving.
EXPLORE FURTHER

The Rosette stitch, an essential stitch for learning hand embroidery
This stitch is used to create small circular raised motifs, ideal for depicting floral buds or isolated textured elements.
In traditional embroidery, it is valued for enriching floral compositions and adding precise, structured decorative details.
Several rosettes can be grouped together to form floral motifs or varied decorative arrangements.

The rosette stitch is a woven stitch.
Its construction consists of repeatedly passing the thread under two straight stitches worked along the same axis, turning regularly around the structure.
It adds an even, dense relief that gives motifs a distinctive and decorative texture.
It integrates naturally into floral compositions worked in hand embroidery.
DISCOVER OTHER STITCHES

Why learn the Rosette stitch?
• understand the principle of woven stitches and their construction around a base structure
• control the regularity of the passes and the thread tension around the straight stitches
• develop volume management in circular raised motifs
• create precise, structured decorative elements in compositions
Learn the Rosette stitch with Un Chat dans l’Aiguille
At Un Chat dans l’Aiguille, the rosette stitch is taught step by step with clear, structured guidance.
Our approach to teaching is part of a complete hand embroidery stitch encyclopaedia, designed to support every embroiderer on their journey.
It allows you to progress at your own pace whilst building precision, consistency, and confidence in hand embroidery.