




Comment broder Twisted insertion stitch
Tutoriels de points de broderie > Tous les points > Twisted insertion stitch
The Twisted insertion stitch, step by step
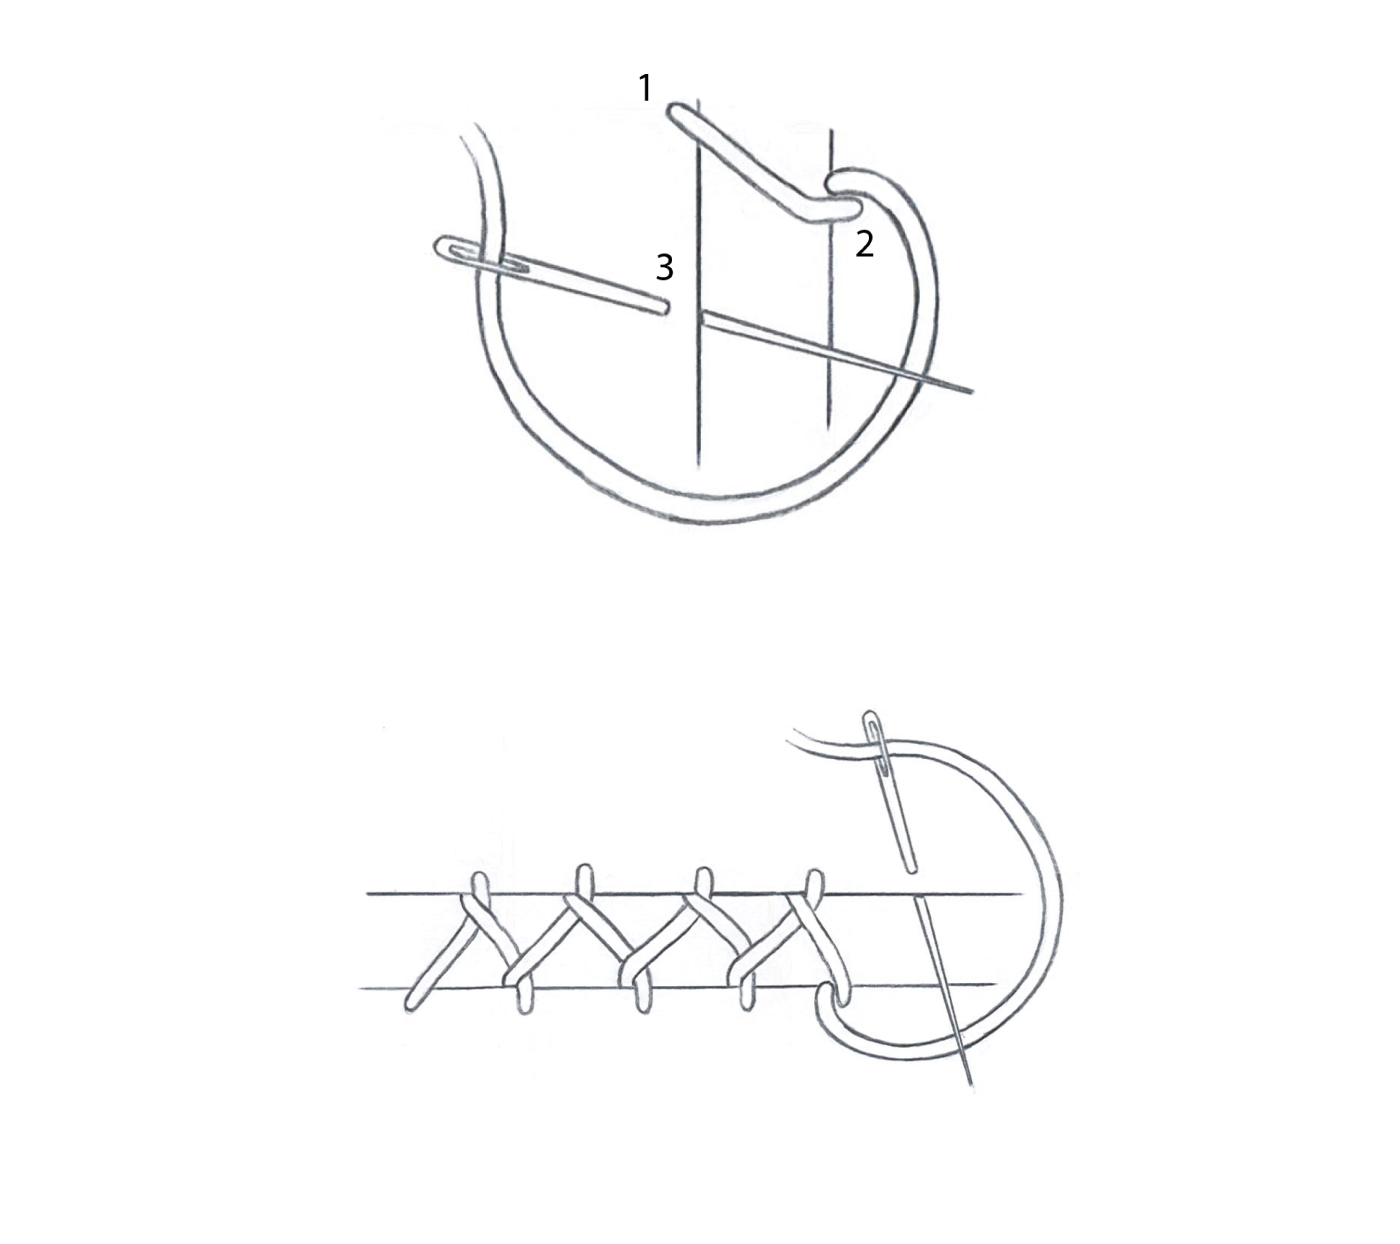
We guide you here, step by step, to embroider the Twisted insertion stitch.
The twisted insertion stitch is worked between two hemmed fabric edges by alternating stitches from one edge to the other, with the thread passing under the tip of the needle at each pass, to form a simple, even openwork structure.
1 – Begin and form the first stitch
Fasten the thread on the wrong side in the selvedge of the hem. Bring the needle up at A. Insert at B on the other fabric edge, from right side to wrong side, then bring up on the opposite edge, the thread passing under the tip of the needle. Pull the thread to form the stitch.
2 – Alternate the edges
Insert at C to bring up on the opposite edge in the same way, the thread always passing under the tip of the needle. Pull the thread to form the next stitch.
3 – Build the pattern
Repeat these two stitches alternating from one edge to the other. Work from top to bottom maintaining an even distance between the stitches. Keep a constant tension to achieve a balanced pattern.
4 – Finish the stitch
Pass the needle to the wrong side in the selvedge of the hem. Fasten the thread under the stitches already worked. ___________
FOR RIGHT-HANDED EMBROIDERERS: Work from top to bottom alternating stitches from one edge to the other. It is also possible to work from left to right depending on the orientation of the motif and your comfort.
FOR LEFT-HANDED EMBROIDERERS: Work from top to bottom following the same alternating principle. It is also possible to work from right to left depending on the orientation of the motif and your comfort. Tips for a successful twisted insertion stitch

Tips for a perfect twisted insertion stitch
Thread position: The thread must always pass under the tip of the needle — it is this gesture that forms the characteristic twist of each stitch and gives the pattern its openwork quality.
Even spacing: Keep a constant distance between the stitches from one edge to the other — uneven spacing would break the visual rhythm of the pattern.
Thread tension: Pull the thread evenly without distorting the edges — too much tension would draw the fabric together and distort the central opening.
Strict alternation: Follow the alternation from one edge to the other scrupulously — a missed or doubled stitch on the same edge would unbalance the whole pattern.
Thread choice: A slightly twisted thread or twisted silk will best highlight the natural twist of this stitch and enhance its decorative effect.
Result
On the front: an openwork insertion formed by alternating zigzag stitches joining the two edges in a light, rhythmic way.
On the back: discreet anchor stitches in the selvedge of the hems.
EXPLORE FURTHER

The Twisted insertion stitch, an essential stitch for learning hand embroidery
The twisted insertion stitch is used to join two hemmed edges while creating a simple, rhythmic openwork effect, particularly appreciated in traditional embroidery for decorative finishes and assemblies.
Its alternating structure produces an elegant pattern whose appearance varies according to the chosen spacing and thread weight.
It makes an excellent introduction to the insertion stitch family.

The twisted insertion stitch: an insertion technique built from alternating zigzag stitches joining two hemmed edges.
Its construction rests on a regular sequence of stitches worked in alternation, the thread forming a slight twist at each pass.
This architecture produces a sober, precise openwork structure that can be adapted according to the distance between the edges and the thread chosen.
It is one of the most accessible techniques in hand embroidery for joining and decorating textile pieces with elegance.
DISCOVER OTHER STITCHES

Why learn the Twisted insertion stitch?
• understand the principle of alternation between two edges to build an insertion pattern
• develop regularity of gesture and control of thread tension
• learn to maintain an even spacing throughout the length of an assembly
• access the insertion stitch family through a simple, elegant technique
Learn the Twisted insertion stitch with Un Chat dans l’Aiguille
At Un Chat dans l’Aiguille, the twisted insertion stitch is taught step by step with clear, structured guidance.
Our approach to teaching is part of a complete hand embroidery stitch encyclopaedia, designed to support every embroiderer on their journey.
It allows you to progress at your own pace whilst building precision, consistency, and confidence in hand embroidery.