




Comment broder Woven picot stitch

Tutoriels de points de broderie > Tous les points > Woven picot stitch
The Woven picot stitch, step by step
We guide you here, step by step, to embroider the Woven picot stitch.
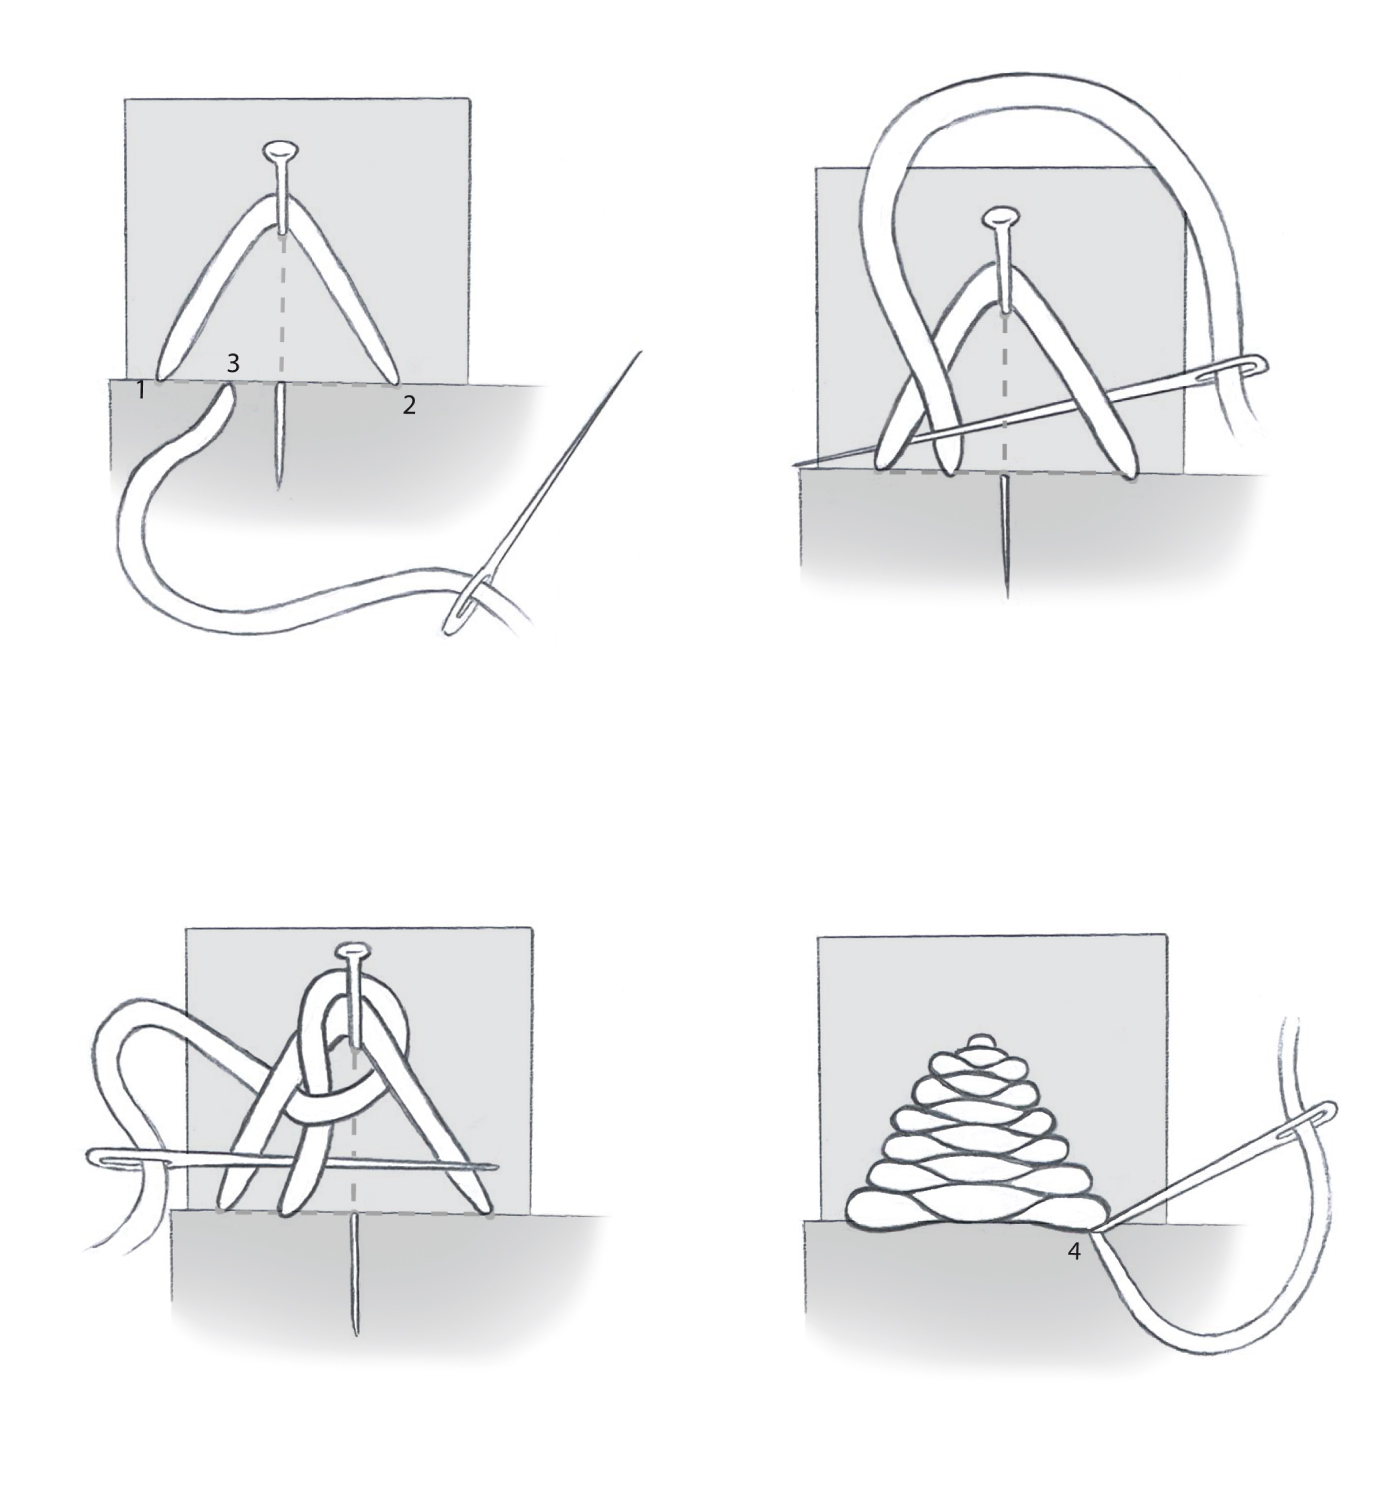
The woven picot stitch is built by weaving the thread back and forth over three base threads stretched around a pin, to form a detached triangular picot that is dense and raised.
1 – Place the pin
Insert a pin perpendicular to the fabric along the base line. The head of the pin forms the tip of the picot, and the height at which it is placed determines the length of the stitch. Bring the needle up below the base line to prepare for laying the base threads.
2 – Lay the base threads
Bring the needle up at A. Pass the thread behind the pin from left to right, then insert the needle at B. Bring it back up at C, between A and B. Pass the thread behind the pin once more from left to right. The three threads needed for weaving are now in place.
3 – Begin weaving
Without piercing the fabric, turn the needle and use the eye to pass from right to left: under the right thread, over the middle thread, then under the left thread. Pull firmly towards the tip to set the first row in place without forming a loop. Turn the work so that the tip faces downwards. Pass the needle over the first thread, under the second, then over the third. Pull gently until the thread touches the edge of one side of the picot.
4 – Continue weaving
Turn the work again and repeat these two movements back and forth. Pack the rows closely together, working up towards the tip to build up the body of the picot. Take care not to pull sideways, as this will tighten the picot.
5 – Finish the stitch
When the needle can no longer pass between the threads, insert it under B on the right side. Hold the picot with the left thumb without pulling the thread. Pass the needle to the wrong side and pull gently to fasten the thread without tightening the base. Secure the thread by passing it under the stitches already worked. ___________
FOR RIGHT-HANDED EMBROIDERERS: Work by turning the piece at each row and hold the picot with the left thumb when finishing.
FOR LEFT-HANDED EMBROIDERERS: Work by turning the piece at each row, adapting the way you hold the picot. Tips for a successful woven picot stitch

Tips for a perfect woven picot stitch
Pin placement: Insert the pin perfectly perpendicular to the base line to achieve an even picot.
Laying the threads: Make sure to pass the thread behind the pin a second time to create three clearly separate threads before beginning to weave.
First row: The first pass must be directed firmly towards the tip to form a neat point with no visible loop.
Weaving tool: Work the entire weaving with the eye of the needle so as never to pierce or catch the stretched threads throughout the process.
Tension and shape: Avoid pulling sideways during weaving to keep the picot open and allow the woven structure to show clearly.
Result
On the front: a dense, structured triangular picot with a fine tip and a well-secured base.
On the back: small, discreet anchor stitches at the base of the picot.
EXPLORE FURTHER

The Woven picot stitch, an essential stitch for learning hand embroidery
The woven picot stitch is used to form detached petals, leaves, and wings in floral and botanical compositions.
Its triangular structure gives it a distinctive place in traditional embroidery.
Several picots arranged in a circle are enough to build a fully three-dimensional flower.

The woven picot stitch: a detached weaving stitch worked on a pin support.
Its construction rests on a set of stretched threads over which the thread is woven back and forth to form a self-contained, adjustable element.
This architecture produces a dense, precise, and gently domed picot whose height varies with the position of the pin.
It is one of the most expressive techniques in hand embroidery for creating detached volume.
DISCOVER OTHER STITCHES

Why learn the Woven picot stitch?
• understand the principle of weaving over stretched threads to create a detached element
• develop gestural precision in three-dimensional work
• control thread tension to achieve a regular, well-formed picot
• enrich compositions with raised floral and botanical shapes
Learn the Woven picot stitch with Un Chat dans l’Aiguille
At Un Chat dans l’Aiguille, the woven picot stitch is taught step by step with clear, structured guidance.
Our approach to teaching is part of a complete hand embroidery stitch encyclopaedia, designed to support every embroiderer on their journey.
It allows you to progress at your own pace whilst building precision, consistency, and confidence in hand embroidery.